How Are Athletic Shoes Made? A Complete Process Guide
By EAXIN Shoes Team | Updated: August 9, 2026
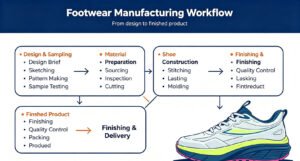
Bringing a custom athletic shoe from a sketch on paper to a finished product on a retail shelf is a complex, multi-stage journey. Each step requires precision, expertise, and careful coordination between your brand and the manufacturing team.
For many new brand owners, the manufacturing process feels like a “black box.” This guide pulls back the curtain to walk you through every stage — from initial design to final delivery — so you understand what happens at each step and how to navigate it successfully.
Whether you’re developing a running shoe, a soccer cleat, or a casual sneaker, the core manufacturing process follows the same fundamental journey. Let’s explore it in detail.
Overview: The 10 Key Stages of Shoe Manufacturing
| Stage | Duration | Key Deliverables |
|---|---|---|
| 1. Design & Brief | 1–2 weeks | Design sketches, tech pack |
| 2. Pattern & Last Making | 1–2 weeks | Last, 2D patterns |
| 3. Material Sourcing | 1–3 weeks | Material swatches, approvals |
| 4. Prototype Sample | 2–3 weeks | First physical sample |
| 5. Fitting & Revision | 1–2 weeks | Revised sample (if needed) |
| 6. Pre-Production Sample | 1–2 weeks | Final approved sample |
| 7. Cutting & Preparation | 1–2 weeks | Cut materials, prepared components |
| 8. Assembly & Lasting | 1–2 weeks | Stitched, lasted upper on sole |
| 9. Finishing & Quality Control | 3–7 days | Finished shoes, inspection |
| 10. Packaging & Shipping | 1–2 weeks | Boxed products, shipping documents |
Total estimated timeline: 8–16 weeks from initial concept to finished product ready for delivery.
Stage 1: Design Conceptualization and Technical Brief
Every great shoe starts with an idea. This stage transforms your vision into a tangible, manufacturable plan that the factory can follow precisely.
The design process typically involves:
- Design Sketches: 2D drawings from multiple angles — top, side, bottom, and back views. These show the overall silhouette, panel shapes, and aesthetic details.
- Colorway Selection: Defining the exact colors, including PMS or Pantone numbers where possible, to ensure accurate material matching.
- Material Indications: Specifying which materials go where — for example, “leather on toe cap,” “knit on quarter panel,” “mesh on tongue.”
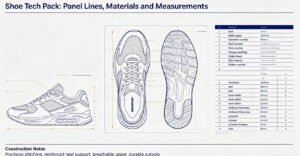
- Technical Package (Tech Pack): A comprehensive document that includes all specifications — materials, sizes, construction details, labeling, and packaging requirements.
Pro Tip: The tech pack is the single most important document you’ll provide. A complete, detailed tech pack saves weeks of back-and-forth communication and reduces the risk of costly misinterpretations. Include reference images, callouts, and measurement notes whenever possible.
The more detailed and visual your brief, the faster and more accurately the factory can execute your design. For a deeper dive into creating an effective tech pack, read our guide on How to Build a Perfect Shoe Tech Pack for OEM Manufacturing.
Stage 2: Last Making — The Foundation of Fit
The last is the 3D mold around which the shoe is built. It defines the shoe’s shape, fit, and size progression. If the last is wrong, nothing else will be right.
At this stage, the factory will either:
- Use an existing last: If you’re working from an ODM base or a style similar to one the factory already produces, they may have a last that fits your design. This is faster and more cost-effective.
- Develop a custom last: If your design requires a unique fit or shape, the factory will create a custom last. This involves carving a 3D model (either manually or using CNC machining) and then making test pairs to refine the fit.
Last development is often the most technically challenging part of the process. A well-made last must consider:
- Foot anatomy: Arch support, toe spring, heel pitch, and width grading across sizes.
- Intended use: A running shoe last differs significantly from a casual sneaker or a soccer cleat.
- Market preferences: US consumers generally prefer a wider fit than European consumers, for example.
Don’t rush this stage. A poorly fitting shoe will ruin your brand’s reputation faster than almost any other issue.
Stage 3: Pattern Making and Material Sourcing
With the last finalized, the factory’s pattern maker creates 2D flat patterns for each panel of the shoe. These patterns are like a tailor’s sewing pattern — they determine exactly how each piece of material must be cut and stitched together to fit the 3D last.
Pattern making is both art and science. The pattern maker must account for:
- Material stretch and recovery: Different materials behave differently when stretched over the last.
- Sewing allowances: Extra material for seams, usually around 3–5mm.
- Panel alignment: Ensuring that all panels match perfectly at the seams.
- Size grading: Scaling the pattern up and down for different sizes while maintaining consistent fit.
Simultaneously, the factory’s sourcing team will begin material procurement. This involves:
- Finding suppliers for the materials you’ve specified (leather, mesh, foam, rubber, etc.)
- Procuring samples of those materials for your approval
- Testing material properties like colorfastness, tensile strength, and abrasion resistance
Pro Tip: Material lead times can be significant, especially for custom colors or specialty materials. Starting the sourcing process early — even before patterns are complete — can save weeks in your overall timeline.
Stage 4: Prototype Sample — The First Physical Shoe
This is where it all becomes real. The factory’s sample makers create the first physical prototype of your shoe using the patterns and materials you’ve approved.
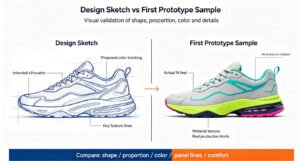
The prototype sample is typically handcrafted by skilled sample makers, not mass-produced. Its purpose is to:
- Validate the design visually: Does the actual shoe match the design sketches?
- Check the fit: Does the shoe fit as expected on a test foot?
- Test material combinations: Do the materials work well together aesthetically and functionally?
- Identify construction issues: Are any panels difficult to stitch? Is the lasting process smooth?
This is your first and most important chance to make changes. At this stage, modifications are relatively easy and inexpensive. Later changes will be significantly more costly.
Stage 5: Fitting Sessions and Revisions
Once you receive the prototype sample, you’ll conduct a fitting session. This is a critical quality gate.
During the fitting session, evaluate the shoe on:
- Fit: Does it feel comfortable? Is the heel locked in? Is there enough toe room? Check width, arch support, and overall feel.
- Function: For athletic shoes, test movement, flexion, and support. Does it perform as intended?
- Appearance: Is the color correct? Are panel lines clean? Is the logo placement perfect?
- Build quality: Check stitching, gluing, and overall workmanship.
Based on the fitting session, you may request revisions. Common revision requests include:
- Adjusting the heel counter for better lockdown
- Changing the toe shape or volume
- Refining material selections or color matches
- Adjusting logo size or placement
Each revision cycle typically takes 1–2 weeks and may involve additional sample costs. The goal is to get everything perfect before moving to pre-production.
Stage 6: Pre-Production Sample (PP Sample)
Once all revisions are complete and you’ve signed off on the final design, the factory produces the Pre-Production Sample. This is the most important sample of the entire process.
The PP sample is different from the prototype in one critical way: it is made using the exact same materials, machinery, and production methods that will be used for the full bulk order.
Your approval of the PP sample is your final sign-off before mass production begins. Review it with extreme care, checking:
- Fit (using the same wear-test procedure as the prototype)
- Material quality and color matching
- Logo and branding accuracy
- Stitching and construction quality
- Packaging and labeling
Once the PP sample is approved, the factory will proceed with bulk material ordering and production planning. This sample becomes the quality standard against which all bulk pairs will be compared.
Stage 7: Cutting and Component Preparation
With the PP sample approved, production begins. The first step is preparing all the components that will go into the shoe.
Cutting: Using the finalized patterns, materials are cut to size. This is often done using:
- Die-cutting: Steel rule dies cut multiple layers of material at once, ensuring consistency.
- CNC cutting: Computer-controlled cutting for precision and complex shapes.
- Manual cutting: For small runs or specialty materials, skilled cutters may cut panels by hand.
Component preparation: Once cut, individual panels are prepared for assembly. This may involve:
- Embroidery or printing logos on panels
- Applying adhesives or reinforcements
- Pre-forming panels with heat or pressure
- Preparing the insole, lining, and other internal components
Quality control at this stage checks each component for color matching, dimensions, and defects. Defective components are rejected before they enter assembly.
Stage 8: Assembly — The Shoe Takes Shape
Assembly is where all the prepared components come together. This is the most labor-intensive stage and requires skilled workers for consistent quality.
The assembly process typically follows these steps:
- Upper stitching: The individual panels are stitched together to form the upper. This is done using industrial sewing machines, with the pattern maker providing assembly instructions.
- Lasting: The stitched upper is pulled over the last (the 3D mold) and secured. This is a critical step that defines the final shape and fit of the shoe.
- Sole attachment: The outsole is attached to the lasted upper. Depending on the construction method, this may involve:
- Direct injection: PU or TPU is injected directly onto the upper.
- Cementing: The sole is glued to the upper using high-strength adhesives.
- Strobel stitching: The upper is stitched to a fabric sock that sits between the upper and the sole.
- Blake or Goodyear welt: Traditional construction for durable, resoleable footwear.
- Heel and toe reinforcement: Counters and toe puffs are inserted for structure and stability.
Stage 9: Finishing and Quality Control
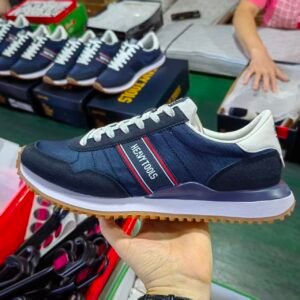
Once assembled, each shoe goes through finishing and quality control before being approved for packaging.
Finishing operations include:
- Trimming excess threads and materials
- Cleaning and polishing the shoe
- Applying edge treatments and buffing
- Heating and shaping for final appearance
- Inserting insoles and laces
Quality Control (QC): Every pair of shoes must pass inspection before packaging. The QC process checks:
- Visual inspection: Color matching, stitching consistency, panel alignment
- Fit testing: Random pairs are checked on a fitting board
- Peel and adhesion tests: Ensuring soles are securely attached
- Flex and abrasion tests: For athletic shoes, performance testing may be conducted
Many brands also hire third-party inspection services to conduct an independent pre-shipment inspection. This adds a layer of quality assurance and reduces the risk of receiving a bad batch. For more, see this external resource on footwear inspection.
Stage 10: Packaging and Shipping
The final stage is packaging and preparation for shipment.
Packaging typically includes:
- Individual shoe boxes printed with your brand and product details
- Dust bags, tissue paper, and inserts
- Hang tags and care labels
- Master cartons for bulk shipping
Shipping preparation:
- Container loading under quality control supervision
- Preparing shipping documents (Bill of Lading, Commercial Invoice, Packing List, Certificates of Origin)
- Arranging freight forwarding and customs clearance
With proper planning, your shoes will arrive at your warehouse in approximately 3–6 weeks after shipment (depending on sea freight schedules and destination).
Conclusion: A Journey of Collaboration
The journey from design to finished shoe is long and complex, but it’s also deeply rewarding. At each stage, close collaboration between you and your manufacturing partner is the key to success.
By understanding the complete process — from last making to final QC — you can communicate more effectively, anticipate challenges, and make better decisions at every step. The more you know, the smoother the journey will be.
At EAXIN Shoes, we guide our clients through every stage of this process. From first sketch to final delivery, we’re committed to turning your vision into a high-quality, market-ready product. For more insights, explore our guide on The Complete Custom Shoe Manufacturing Process.
Ready to start your custom shoe project?
Contact EAXIN Shoes today to discuss your design, get expert guidance, and begin your manufacturing journey.