Stop Overpaying: The Real Cost of Your Shoe Order Revealed
By EAXIN Shoes Team | Updated: August 9, 2026
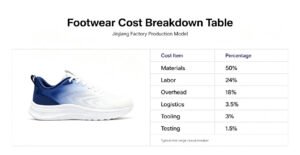
When you’re launching a private label shoe brand or scaling an existing line, the factory’s unit price is only the beginning. The total cost of your order is a complex equation involving materials, tooling, testing, logistics, and several hidden expenses that can catch first-time importers off guard.
This guide will walk you through every cost component in detail. We will cover material costs, MOQ, mold fees, sampling, testing, logistics, and duties. We will also discuss common hidden costs. By the end, you will have a clear formula to budget accurately for your shoe production.
1. The Bill of Materials (BOM): Your Starting Point
Every shoe quote begins with a Bill of Materials — a line-by-line breakdown of every material and component that goes into one pair. Understanding the BOM is the single most important step in calculating your true cost per pair.
A typical BOM for a sneaker or casual shoe includes:
- Upper materials (25–45% of FOB price): Leather, synthetic, mesh, or knit. Material grade and cutting yield significantly impact cost.
- Lining and insole (5–12%): Breathability, cushioning, and antimicrobial treatments add to cost.
- Outsole (8–18%): Rubber, PU, TPU, or EVA. Mold complexity and material density are key drivers.
- Internal components (3–8%): Heels, shanks, toe puffs, and counters — structural elements that affect fit and durability.
- Trims and hardware (2–7%): Custom buckles, eyelets, zippers, and branded metal parts.
- Packaging (2–5%): Shoe box, tissue paper, dust bags, hang tags, and inserts.
Pro Tip: Always ask your factory for a costed BOM — not just a unit price. A transparent BOM shows exactly where your money goes and enables you to compare quotes on substance rather than headline numbers.
For example, at a mid-range full-grain leather cost of $4.90 per square foot and 3.0 square feet per pair, a 10% improvement in cutting yield (from 60% to 70%) saves roughly $1.47 per pair — which adds up to $7,350 on a 5,000-pair order. This is why working with an experienced manufacturer matters.
For more on material sourcing, you can refer to this external resource on Bill of Materials.
2. MOQ: Minimum Order Quantity and Its Impact on Cost
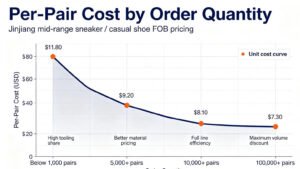
MOQ is often misunderstood as a simple “minimum pairs required.” In reality, MOQ is a strategic threshold that determines how fixed costs get spread across your order.
Here’s how MOQ affects your per-pair cost:
| Order Quantity | Typical Discount vs. Base Price | Best For |
|---|---|---|
| 50–100 pairs | Base price (no discount) | Market testing, samples |
| 200–500 pairs | –8% to –12% | Small brand launch |
| 1,000–2,000 pairs | –15% to –20% | Scaling a proven style |
| 5,000+ pairs | –20% to –28% | Established brands, wholesale |
Source: Based on industry standard pricing curves.
The biggest price drop happens between MOQ and roughly 3x MOQ. Beyond 5,000 pairs, savings shift from unit price to logistics efficiency.
If the factory’s proposed MOQ is above your budget, consider these practical strategies:
- Review existing molds: Using an existing outsole mold reduces upfront tooling costs and often lowers MOQ.
- Reduce color or size fragmentation: Start with 2–3 sizes and 1 colorway, then expand with reorders.
- Remove high-cost decorations: Simplify embroidery, hardware, or printing for the initial run.
60 pairs is a sweet spot for market testing when using an existing last and outsole mold, standard materials, and light branding. Total product cost at $25–$40 per pair comes to $1,500–$2,400, plus $300–$600 for shipping — a market test for under $3,000.
3. Mold Fees: The One-Time Cost That Matters Most
Mold tooling is often the largest one-time expense in shoe manufacturing. Understanding what you’re paying for — and whether it’s necessary — can save you thousands.
Types of Tooling and Typical Costs
| Tooling Type | What It Does | Typical Cost Range |
|---|---|---|
| Shoe Last | Defines the 3D form, fit, and size grading | $500–$2,500 per size range |
| Outsole Mold | Creates the sole geometry, tread, and thickness | $1,500–$5,000+ |
| Badge / Hardware Tool | Custom metal logo, buckle, or eyelet | $300–$1,000 |
| Print / Emboss Setup | Screens, plates, or dies for logo application | $100–$500 per color |
Source: Based on industry tooling cost estimates.
Key Insight: If your annual volume is below 2,000 pairs, custom tooling may not be cost-effective. Starting with an existing style (using a “public mold”) is often the smarter financial move. However, if your brand requires a unique silhouette, consider offering to pay the tooling fee upfront — this signals seriousness to the factory and can help negotiate a lower MOQ.
A cautionary tale: In one real project, a buyer-provided last did not match the existing sole mold, so the proposed combination could not move into sampling. The buyer had to either create a new mold or redesign the shoe. This is why compatibility checks between last, sole, and upper are essential before you commit to tooling.
4. Sampling and Development Costs
Sample development is a separate project stage with its own cost structure. It’s not the same as bulk production — and understanding what you’re paying for will help you manage revisions and avoid “scope creep.”
Typical sample cost components include:
- Pattern making and cutting
- Materials (often from stock; buyer-specified materials may cost more)
- Technician time
- Shipping (international courier for sample delivery)
- Possible tooling setup fees (charged separately if custom molds are needed)
One of the biggest mistakes new brands make is treating multiple sample revisions as “minor adjustments.” Each revision can add to the material, labor, and shipping cost. It’s essential to define each sample round by size, color, material, and approval purpose to avoid unlimited fees.
Before paying for a sample, ask the supplier to state:
- What the sample charge includes
- Which sizes and colors will be produced
- Whether tooling is separate or included
- What files or materials are still pending
- How another revision would be handled
Remember: fixing problems at the sample stage is cheap; fixing them in production is expensive. A thorough sample approval process saves money in the long run.
5. Direct Labor and Factory Overhead
Labor costs vary significantly by factory location and automation level. In China, direct labor typically accounts for 15–25% of the FOB price. By comparison, Vietnam’s labor costs are roughly one-quarter of China’s, though efficiency differences and logistics must be factored in.
Factory overhead (utilities, equipment, supervision, indirect labor) adds another 5–10%. For a full breakdown of labor and overhead allocation, refer to our guide on Understanding Factory Pricing: Labor and Overhead.
6. Quality Control and Testing
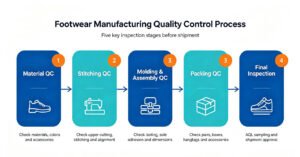
Pre-shipment inspection is a cost that many first-time buyers skip — and later regret. QC costs typically represent 1–3% of the order value, but they can prevent catastrophic losses.
Key testing and inspection costs include:
- Laboratory testing: Material safety, colorfastness, strap pull tests, slip resistance
- Third-party inspection: Independent QC at AQL levels
- In-house QC: Factory’s own quality checks
A pre-shipment inspection is your last line of defense. Once the balance clears and the container is sealed, your ability to address problems drops to near zero. For more, see this external resource on footwear inspection.
7. Logistics and Duties: Getting Your Shoes to Market
Shipping and duties are often underestimated, especially for small orders. Here’s what to expect:
Shipping Costs (Inland + Ocean/Air Freight)
| Shipping Method | Cost per Pair (Estimate) | Delivery Time |
|---|---|---|
| Air Freight (small orders) | $5–$15+ | 3–7 days |
| Sea Freight (consolidated) | $1–$3 | 25–40 days |
| Sea Freight (full container) | $0.50–$1.50 | 30–45 days |
For a 60-pair order, air freight might add $300–$600 — potentially exceeding the product cost. Sea freight is more economical for larger quantities.
Customs Duties and Tariffs
Tariffs can significantly impact your total landed cost. For example, following the 2018–2019 U.S. tariffs on Chinese goods, some Chinese-made footwear faced combined duties exceeding 30%, while Vietnam-made footwear entered the U.S. at near-zero tariff rates. Check the current tariff rates for your product category and destination country before finalizing your budget.
8. The Complete Cost Calculation: Step-by-Step
To calculate your total cost per pair accurately, follow this systematic approach:
- Build the Bill of Materials (BOM): Sum every material cost per pair.
- Calculate direct labor per pair: (Time per pair in hours) × (Factory wage per hour) × (Payroll tax factor).
- Amortize tooling and development: Tooling cost ÷ total run size = tooling per pair.
- Allocate overhead: (Total monthly factory overhead ÷ monthly production units) × units in your run.
- Add packaging, freight, and duties per pair.
- Adjust for yield and add contingency: Effective units = ordered units × (1 – scrap rate). Add 1–3% contingency.
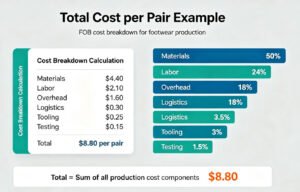
Example: 500-Pair Sneaker Order
- Materials per pair: $12.00
- Labor per pair: $4.00
- Tooling amortization per pair ($2,000 ÷ 500): $4.00
- Overhead per pair: $2.00
- Packaging per pair: $0.80
- Freight and duties per pair: $1.70
- Scrap reserve per pair (3%): $0.50
Total cost per pair = $25.00
This $25.00 is your production cost. Add your target margin, marketing, and other selling expenses to set your wholesale or retail price.
9. Hidden Costs and Common Pitfalls
Even with a detailed BOM, several hidden costs can blow your budget:
- Material yield (scrap rate): Natural leather hides have imperfections. A 60% cutting yield versus 75% can add $1.50+ per pair in wasted material.
- Sample revisions: Each round of changes adds to development cost and delays.
- Payment terms (30/70 deposit): The 70% balance before shipment is industry standard. Factor this into your cash flow planning.
- Exchange rate fluctuations: If you’re paying in USD and your local currency weakens, your effective cost rises.
- Peak season surcharges: Q3 and pre-Chinese New Year periods often add 7–10 days to lead times and may increase logistics costs.
Always build a buffer of 10–15% into your total budget for unforeseen expenses, especially on your first order.
Conclusion: The Big Picture
Calculating the total cost of a shoe order is not just about the unit price you negotiate. It’s about understanding every line item — from the cost of leather to the last mile of shipping — and making strategic decisions at each step.
Remember:
- Know your BOM: Ask for transparency from your factory.
- MOQ is strategic: Choose a quantity that balances cost and risk.
- Tooling is an investment: Evaluate whether custom molds are necessary for your brand.
- Sampling is your quality gate: Invest time here to avoid production disasters.
- Logistics and duties add up: Factor them into your pricing from day one.
By taking a comprehensive view of your total order cost, you’ll be better equipped to price your products competitively, manage your cash flow, and build a sustainable footwear brand.
Ready to get an accurate quote for your shoe order?
Contact EAXIN Shoes for a transparent, detailed BOM and a no-surprises cost estimate. We’ll walk you through every line item.